Build & Train Your Agent
Registering with StyleFlo is easy, simply head over to https://styleflo.ai/app/?mode=register and select the package best suited for you or your business needs. Once selected you will be taken to the registration page.
You will need the following details to be able to register;
- Name
- Email Address
- Business Name
- Website (Optional)
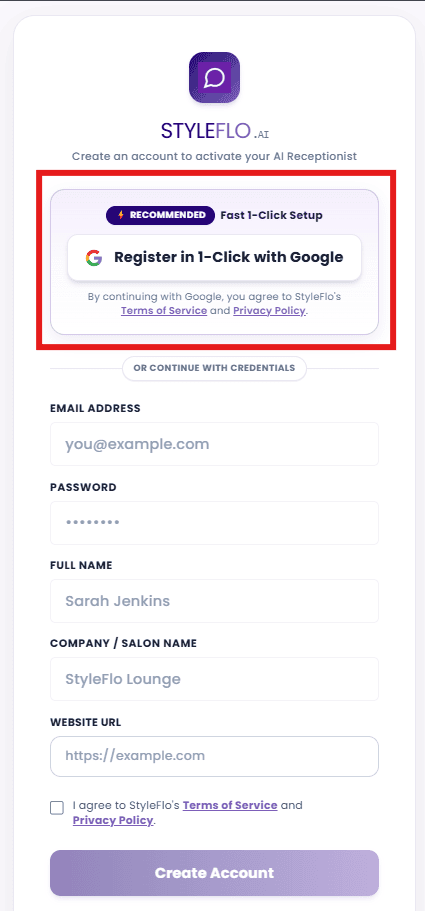
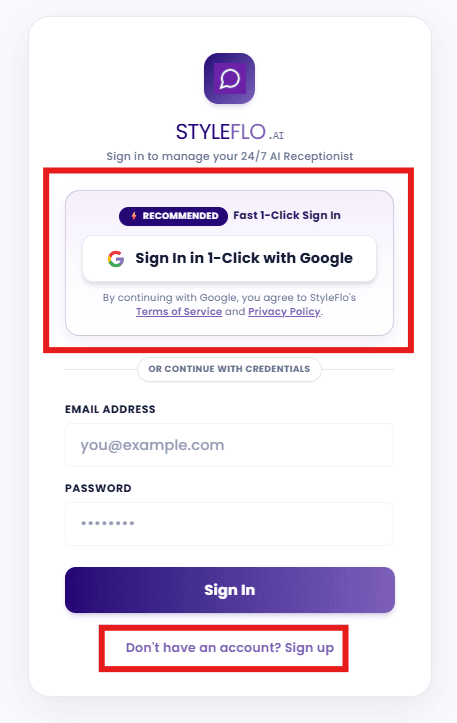
Access to the StyleFlo Dashboard is gained by using either your Google login details (preferred0 or your username and password and can be done here
Once registered we have a dedicated area in which you will create your agent. Starting with;
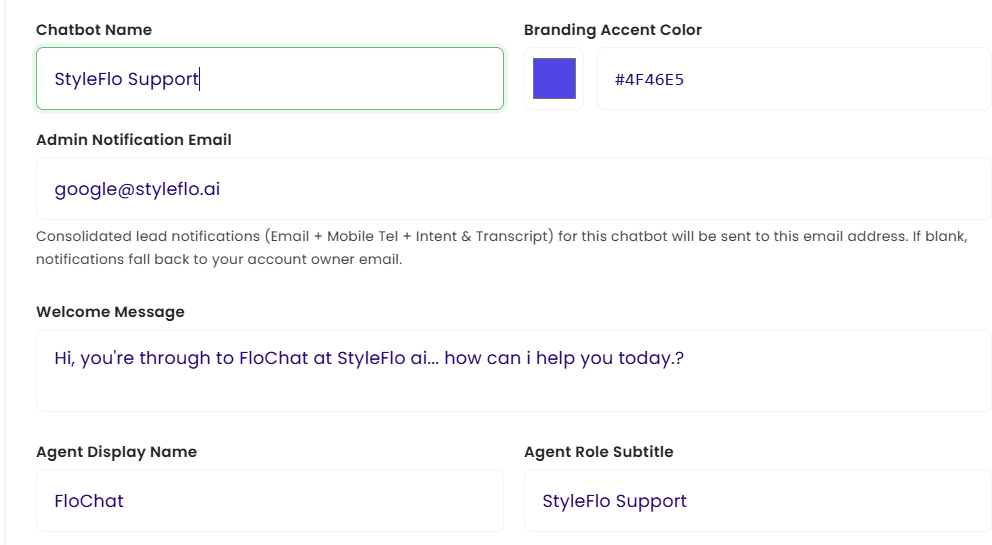
- Agent Name - this is the name you will use to identify your agent eg. Receptionist, Front of House, Assistant.
- Branding Accent Colour - your business brand is important, if you are adding your agent to a website choosing your colour is important, it also affects the colours on the landing page we supply for FREE.
- Admin Notification Email - when your agent collects data on potential clients this is the email that will recieve that data
- Agent Display Name - the name you choose for the customer to see
- Agent Role Subtitle - where you describe the role of your agent eg. Out Of Hours Support Agent
- Welcome Message - How your agent will great your customers.
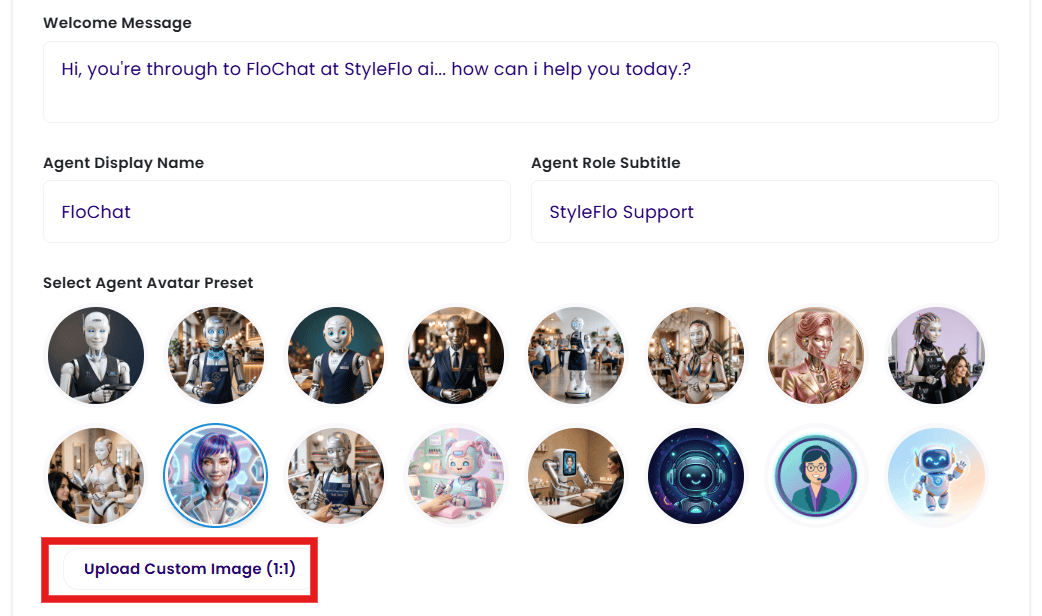
- Select Agent Avatar - the look of your agent is up to you, you can either use one of our faces, or upload your own, you can even use your business icon
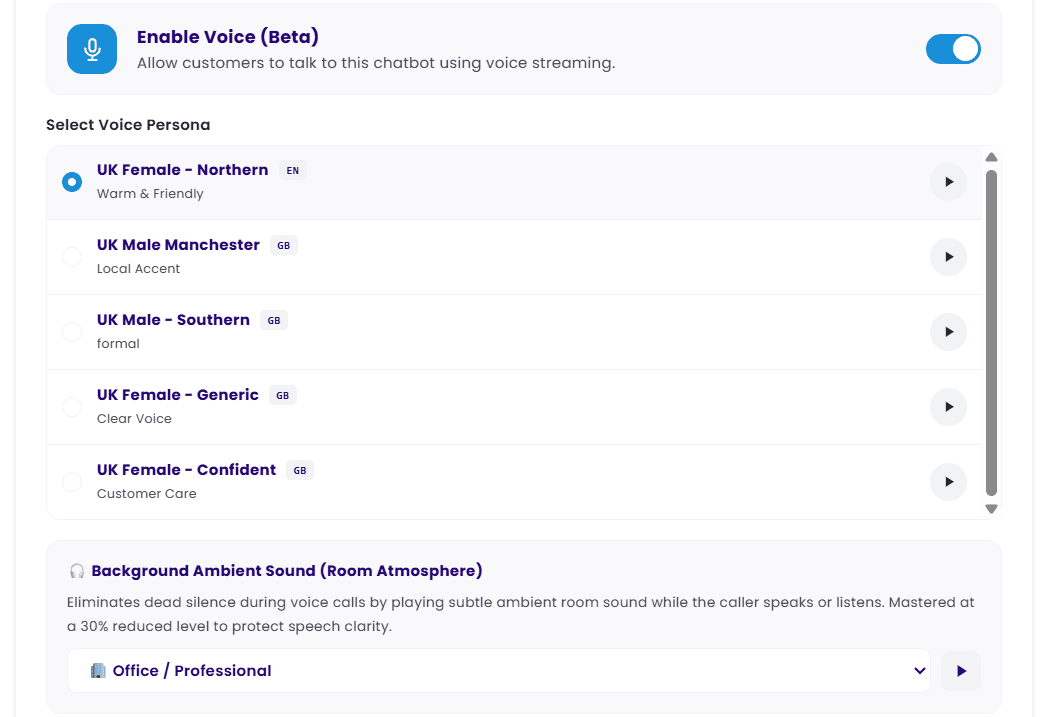
- Enable Voice - here you activate your agents voice, listen to then first then choose from the available options
- Background Noise - depending on your business type you can add an ambient noise to make the voice calls even more realistic
Once inside the dashboard, navigate to Knowledgebase in the left hand navigation,
There are multiple ways to 'train' your agent;
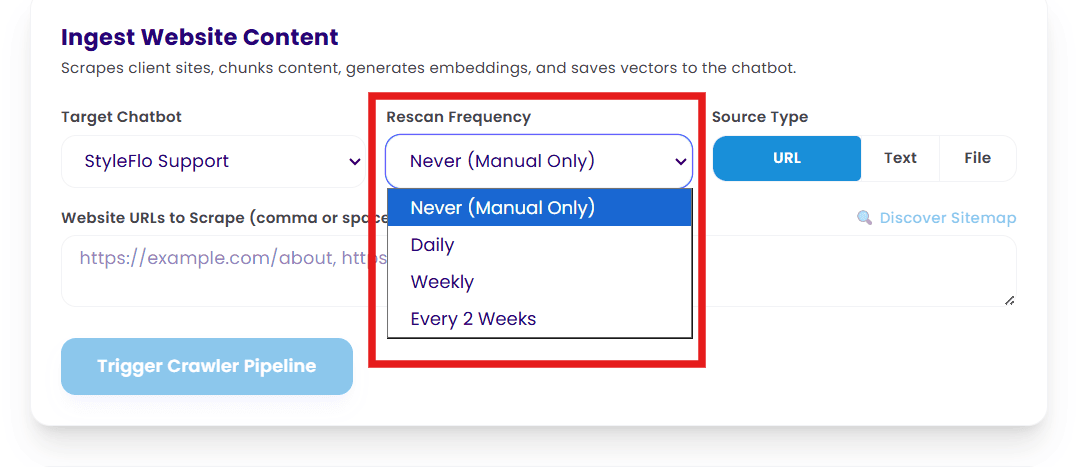
Website URL - If you add the website and then select 'Discover Sitemap' our server will return a list of urls for the scrapper to follow. Note: some websites do not allow scrapping, if this is the case you may need to add individual pages with a comma separating them, or with a different page URL on each line. You can also ask the agent to go back and check your website for new content on a daily/ weekly/ 2 weekly timeframe, handy if your updating products or adding new ones.
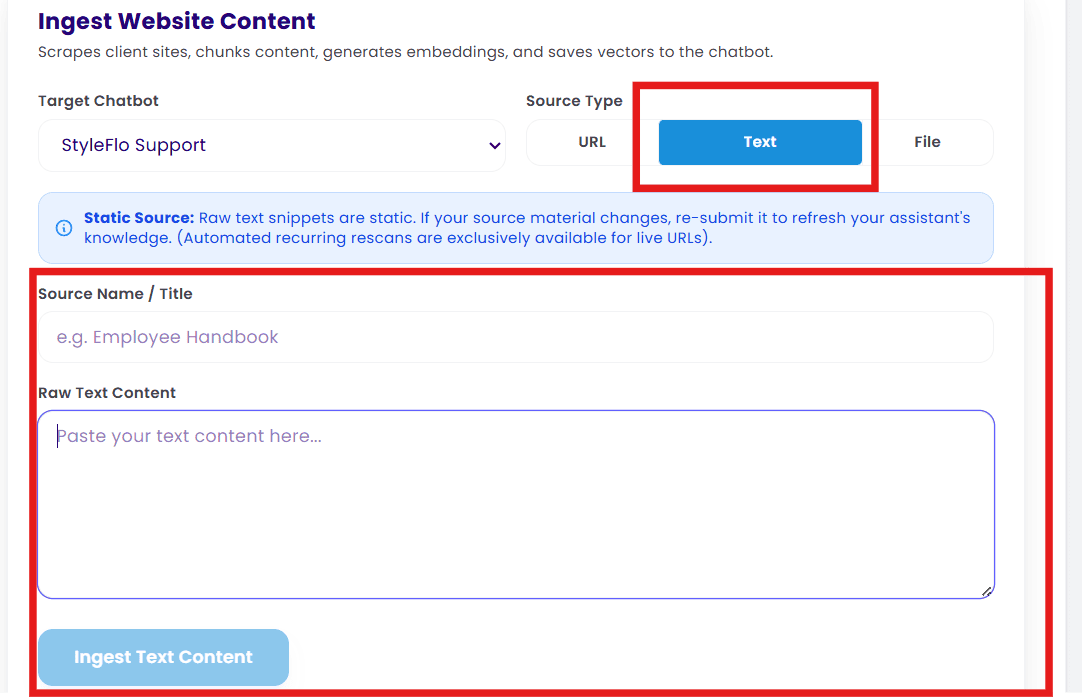
Text Entry - If it does still not work, you should try cutting and pasting the content directly into the text uploader. you can also use this area to add 'ad hoc' data like a 'sale for today only'
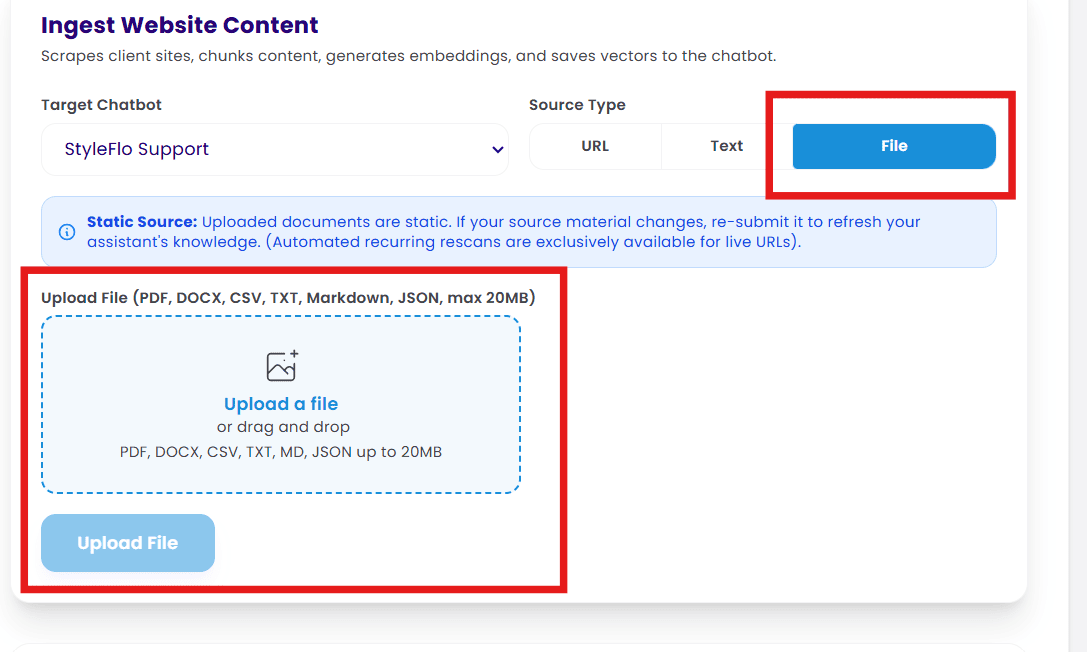
File Upload - filetypes that can be uploaded include PDF, DOCX, CSV, TXT, Markdown, JSON, with a max size of 20mb. If you upload a .pdf with images on it, the agent will only be able to read the text and may throw an error message.
Setting Up Google Calendars
In your dashboard head over to the Scheduling & Staff tab in the left hand navigation
If you already have a website and use an external booking platform (Booksy, Fresha etc.) you do not need to add your colleagues, however, it would benefit your Agent to know who works for you and what skilsets they hold
This is your choice, if you are continuing to use another external booking system staff names and bio's are not required, you must not that by not entering any details, nothing will display on your webpage. The chatbot will also have no point of reference as to who can do what service in yoour service catalogue
Select Scheduling & Staff from the left hand navigation in your dashboard. Head to the section titled Scheduling & Booking Mode
We want you to have a choice, if you're going to continue with your existing booking tool (Booksy, fresha, salonIQ et.) then you can select option 4 and add your booking URL in the box provided
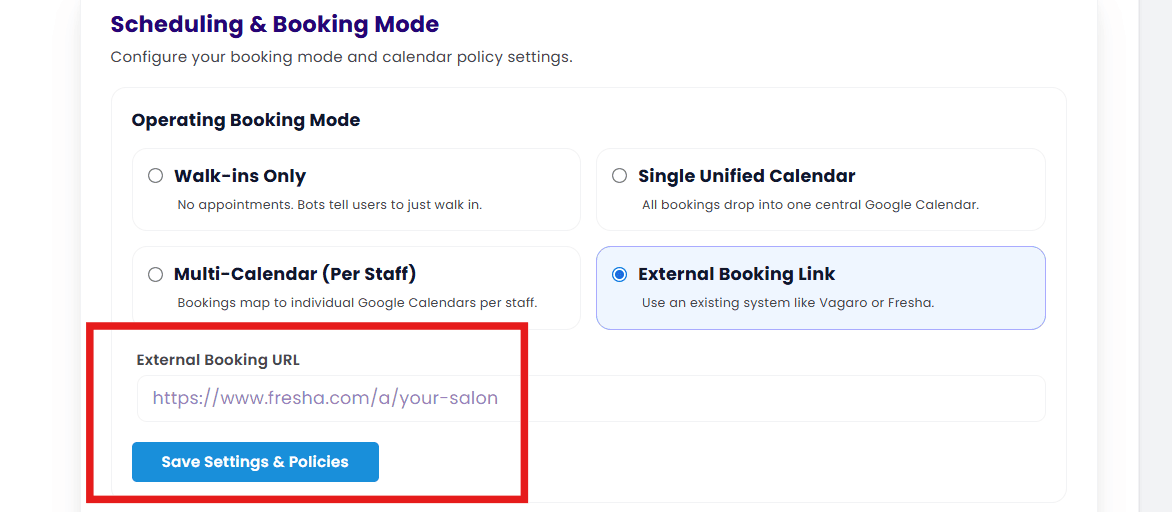
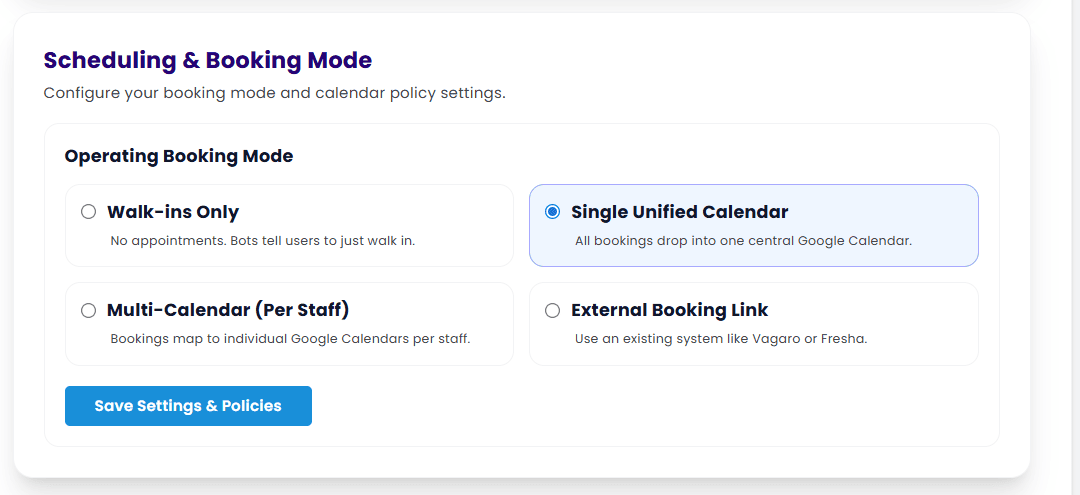
The four options you have are explained on the page, and to explain the multi calendar; 'Google allows you to create sub calendars within the main calendar', this is ideal if you have multiple employees. An explanaition on how to create and manage a Google Calendar,
once you select the option you want the Google authorisation button will become visible. when you select this you will be asked to verify which Google account you wish to scync with StyleFlo.
Note: Our recomendation is that you do not use your personal calendar or Google account for this purpose as you may wish so share calendar access with your colleagues at a later date
We offer this service so that colleagues can manage their own rota, it removes the need for an individual to add everyones availability into one calendar. you will still see a unified view of all calendars in the dashboard
If you want each colleague to have their own calendar (recommended) and you are using Google Calendar, select the setting cog in the top menu.
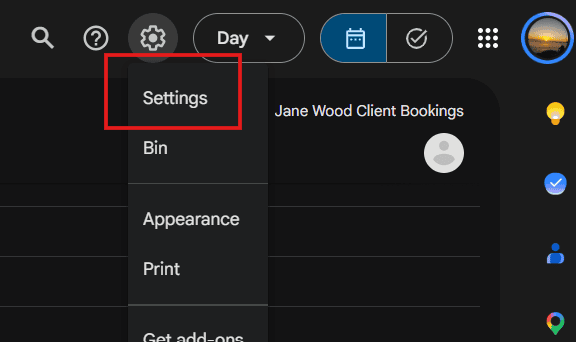
Then select create new calendar and follow the instructions

You should name your calendar something meaningful (colleague name) and once you calendar is ready, scroll down to the integrate calendar section, copy the calendar ID and keep it safe

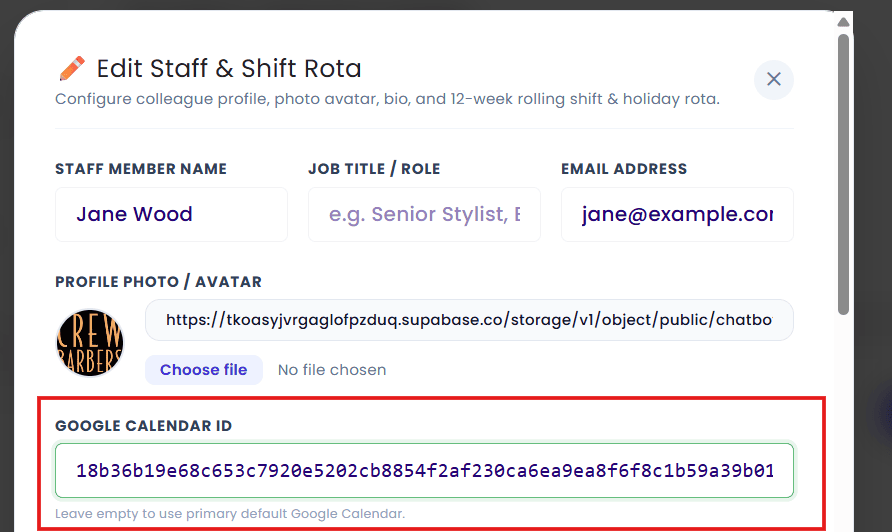
You can then head back to the dashboard and add the calendar to the staff member you created earlier.
All FAQs
- Account
- Agent
- Booksy (or other)
- Cancelation
- Compliance
- Data Retention
- GDPR
- Google Auth
- Google Calendar
- HIPPA
- HPI
- Knowledgebase
- Register
- Registration
- Regulated Industries
- Rota
- Schedule
- Security
- Services
- Shift
- Shopify
- Staff
- Stats
- Technical Issues
- Telephone
- Webpage
Visit our pricing page and select the product most suited to your business, the button will take you through our onboarding process in the membership hub
Depending on the level of membership chosen, we need details to allow us to commission your workspace within our dashboard, the details requested at registration is the minimum we need to start your journey with us
This is great news, having already started your digital journey, we supply a small piece of code that allows you to either display a floating chat button at the bottom of your webpagw, or, a second piece of code that allows you to embed the chat on any page within your website, send these to the website designer for deployment, or contact us if you don't have a website manager.
Our database uses Oauth login, and Row-Level Security (RLS) which is a data access control method that restricts which rows in a database table a user can see or change based on their identity, role, or permissions. The three core components are a user identifier (who is logged in), a mapping table (what rules apply to them), and a security rule (the filter applied at query time).How RLS WorksAutomatic filtering: The database engine or reporting tool applies the filter in the background every time a query runs.Consistent enforcement: Rules apply no matter how a user accesses the data, whether through an app, a direct SQL query, or a dashboard. Shared tables: Multiple tennants can safely share the same physical table without seeing each other's private data
Embedding the chatbot as a floating button is simple, just copy the small piece of code from your dashboard into the header of the page you wish to display it on. You may need to ask whoever manages your website to do this for you. Don't worry, we also supply your chatbot on a web page, so you can share as soon as you have uploaded your knowledge
Embedding as a widget is very similar to embedding the floating button, only the code is slightly different and you would add the code where you wish to display the chatbot
If you already have a website, your designer will be able to supply this, however, its just as easy, and possibly quicker to view your website on a desktop/ laptop, hover your mouse over the colour you want to know, right click and seelect inspect
Inside the dashboard, when a chatbot is created you will find an option to upload a 1:1 scale image, we recommend 150px x 150px the upload button can be found just below the pre selectable images. Images can be uploaded at any time after creation by editing your chatbot
When you disconnect a calendar, the data in the calendar will remain, it's your calendar, however, the Chatbot will no longer be able to add or amend any new bookings
Yes, you can. Don't forget to notify your customer
As the owner of the calendar, you can change or alter anything within it, and, depending on your settings within the calendar, an automated email may be issued by google. If you alter the dat/ time of a booking, your agent will add a new booking to the old times if you do not block it out.
We would recommend that you have different chatbots for each location, hoever, you could document the different locations and upload the data to the chatbots knowledgebase and have one calendar for each unit. If you have colleagues who travel between the units, you should also add this data to the knowloedgebase
Yes, all our systems and proceedures conform to latest GDPR requirements, you should note that you are responsible for your customers GDPR
Either message us or call and request someone to return your call, we will respond as soon as possible, you should be aware that we will ask you if you have been requested by law to retain any data by a law enforcement agency before we can delete anything
We use a PostGresSQL DB with Oauth and Row Level Security (RLS) which means your data is as secure as it can possibly be, and no other business will ever have access to your data
Apart from your business colleagues, the StyleFlo administrator can access your account, there is no other access
If colleagues have their own calendar you can add them, we would advise not giving your account details or password to anyone
We will never share your, or your customer date with anyone unless the request is from a legal entity (Police, Government etc) in relation to a criminal offence. we do not 'sell' your data, we do pledge to keep it secure and adhere to UK GDPR guidelines
If you can't find a resolution to your question by talking to our AI receptionist, simply leave your mobile number and we will return your call as soon as possible
We are an artificial intelegence company that has been created to help small businesses (we also service large businesses) tcompete in a modern workplace
We use AI in different context during your customers journey with Styleflo. The only data the chatbot has access to is the data you have supplied, Opening times, Staff Details,
If the data changes on your website, you can set a #rescan# time when you add the data, timeframes include daily, weekly, monthly etc. when this is selected we will automatically scan and delete old data, replacing it with the new
Yes, if data you used to train your chatbot changes, you can delete and re add as needed. you can also set a refresh schedule for web page crawls for items such as shop products that change on a daily/ weekly basis
You can delete staff members in the dashboard, the calendar you have for appointments, is yours, you can either change the name, or delete it, it's up to you
Most of the data is imported from Google Places, we use the API so that would be your first place to check, if data is not available there, we take it from the dashboard. If you still cant find the culprit, simply drop us a message on our chat
The UK telecoms industry is stricter than some other countries and expect users to have a business number.
If the chatbot has informed you that someone will contact you with a resolution to your query it will request your telephone contact number and/ or your eamil address
You should tell the chatbot to get a human to call you back, or email you and leave your contact details
As a business owner, you should request this from the styleflo chatbot, who will set the process in motion for the data to be extracted, we will adhere to all GDPR compliance during this and future communication
If you are unavailable for appointment booking, you must block that time out in your calendar, when a customer requests an appointment, the chatbot analyses the current availability in the individuals calendar, andwill not book the same time out twice
You should follow the process you already have in place, you can move appointments around and assign other colleagues, you must remember to block out the sick colleague or the chatbot will continue to add appointments
In the dashboard, you can delete a colleague if you have the correct permissions, however, you must remember to reassign any future appointments in thay colleagues calendar or they will be lost
There is currently no limit on the number of concurrent calls a chatbot can take, your technical spec is set to grow automatically when it starts reaching a certain volume
The user dashboard has a stats panel on the homepage that tells you haw many appointments the chatbot has added
Only if you have the correct persissions (admin)
Like the text chats, there is no uper limits set to the number of concurrent calls that can be made
Once you have your styleflo supplied phone number, you can simply forward calls from your landline or mobile to it, you should be aware that you will be responsible for any costs associated with forwarding calls
If you encounter any error but the chatbot is still operational, please report the error code to the bot at the time,. if the bot is not working due to an error, we will automatically be alerted and we would advise you to return later to reconnect
In the schedule section of the dashboard, the field for adding your booking link will not display until you have selected that option from the calendar types available
No, it is your choice whether to use an existing booking system like Booksy, or the styleflo calendar integration, but you must only use one, using both will cause double bookings
Dashboard QR Code Pairing Modal ( WhatsApp Web)
Instead of running terminal commands, you connect your WhatsApp directly from your StyleFlo dashboard:
You must navigates to Chatbot Manager → WhatsApp Channel and click "Connect WhatsApp".
StyleFlo calls the Gateway API to generate a pairing QR code.
The QR code displays directly on the StyleFlo screen inside a modal popup.
You then open WhatsApp on their business phone → Settings / Linked Devices → Scan QR Code.
Once scanned, the gateway saves your session credentials in your folder and updates your status to Connected
Registering with StyleFlo is easy, simply head over to https://styleflo.ai/app/?mode=register and select the package best suited for you or your business needs. Once selected you will be taken to the registration page.
You will need the following details to be able to register;
- Name
- Email Address
- Business Name
- Website (Optional)
Access to the StyleFlo Dashboard is gained by using either your Google login details (preferred0 or your username and password and can be done here
Once registered we have a dedicated area in which you will create your agent. Starting with;
- Agent Name - this is the name you will use to identify your agent eg. Receptionist, Front of House, Assistant.
- Branding Accent Colour - your business brand is important, if you are adding your agent to a website choosing your colour is important, it also affects the colours on the landing page we supply for FREE.
- Admin Notification Email - when your agent collects data on potential clients this is the email that will recieve that data
- Agent Display Name - the name you choose for the customer to see
- Agent Role Subtitle - where you describe the role of your agent eg. Out Of Hours Support Agent
- Welcome Message - How your agent will great your customers.
- Select Agent Avatar - the look of your agent is up to you, you can either use one of our faces, or upload your own, you can even use your business icon
- Enable Voice - here you activate your agents voice, listen to then first then choose from the available options
- Background Noise - depending on your business type you can add an ambient noise to make the voice calls even more realistic
Once inside the dashboard, navigate to Knowledgebase in the left hand navigation,
There are multiple ways to 'train' your agent;
Website URL - If you add the website and then select 'Discover Sitemap' our server will return a list of urls for the scrapper to follow. Note: some websites do not allow scrapping, if this is the case you may need to add individual pages with a comma separating them, or with a different page URL on each line. You can also ask the agent to go back and check your website for new content on a daily/ weekly/ 2 weekly timeframe, handy if your updating products or adding new ones.
Text Entry - If it does still not work, you should try cutting and pasting the content directly into the text uploader. you can also use this area to add 'ad hoc' data like a 'sale for today only'
File Upload - filetypes that can be uploaded include PDF, DOCX, CSV, TXT, Markdown, JSON, with a max size of 20mb. If you upload a .pdf with images on it, the agent will only be able to read the text and may throw an error message.
To add colleagues to your dashboard. head over to Scheduling & Staff and select 'Add Staff Member' Add as much detail as possible as this data is used to populate your FREE webpage, and tell your agent when they are available for
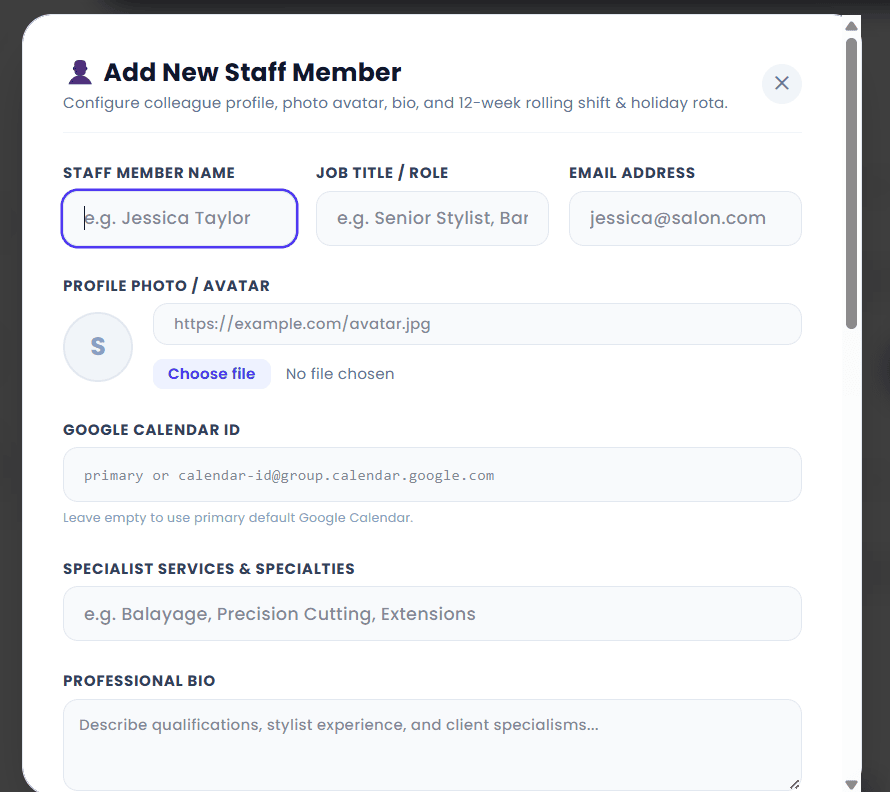
Enter the Google Calendar ID you created earlier to link the colleague and calendar.
Adding your rota couldnt be simpler, just log into the dashboard, head over to schedule and add your am and pm shift pattern, and if you do the same days each week you can 'copy to next week' with one click. You can enter your shifts as far in advance as the business admin has set

In your dashboard head over to the Scheduling & Staff tab in the left hand navigation
If you already have a website and use an external booking platform (Booksy, Fresha etc.) you do not need to add your colleagues, however, it would benefit your Agent to know who works for you and what skilsets they hold
This is your choice, if you are continuing to use another external booking system staff names and bio's are not required, you must not that by not entering any details, nothing will display on your webpage. The chatbot will also have no point of reference as to who can do what service in yoour service catalogue
Select Scheduling & Staff from the left hand navigation in your dashboard. Head to the section titled Scheduling & Booking Mode
We want you to have a choice, if you're going to continue with your existing booking tool (Booksy, fresha, salonIQ et.) then you can select option 4 and add your booking URL in the box provided
The four options you have are explained on the page, and to explain the multi calendar; 'Google allows you to create sub calendars within the main calendar', this is ideal if you have multiple employees. An explanaition on how to create and manage a Google Calendar,
once you select the option you want the Google authorisation button will become visible. when you select this you will be asked to verify which Google account you wish to scync with StyleFlo.
Note: Our recomendation is that you do not use your personal calendar or Google account for this purpose as you may wish so share calendar access with your colleagues at a later date
We offer this service so that colleagues can manage their own rota, it removes the need for an individual to add everyones availability into one calendar. you will still see a unified view of all calendars in the dashboard
If you want each colleague to have their own calendar (recommended) and you are using Google Calendar, select the setting cog in the top menu.
Then select create new calendar and follow the instructions
You should name your calendar something meaningful (colleague name) and once you calendar is ready, scroll down to the integrate calendar section, copy the calendar ID and keep it safe
You can then head back to the dashboard and add the calendar to the staff member you created earlier.
If the account owner adds the business hours as 9:00 - 5:00pm and you do not book your break times in your personal schedule, the agent will be unaware and will accept a booking over your planned lunch or orther break
We allow you to add appointments as far in the future as you wish, there is a setting in the dashboard that allows you to set a timeframe in weeks, so if you only want customers to be able to book
We add padding as a way of knowing how much time has been spend either finishing paperwork, or cleaning up after the previous client, or preparing for the next one, plus some businesses that operate a mobile service need this to travel between appointments